How to Self-Host Next.js with Coolify: Complete Production Guide
A step-by-step guide to self-host Next.js with Coolify on your own VPS: install Coolify, choose Nixpacks or a standalone Dockerfile, wire up PostgreSQL and env vars, and harden it for production.

On this page
- Why self-host Next.js with Coolify instead of a managed platform?
- When is a managed platform still the better choice?
- What do you need before you start?
- How do you install Coolify on a VPS?
- How do you deploy a Next.js app on Coolify?
- Nixpacks or Dockerfile: which build pack should you use?
- How do you build a production Dockerfile with standalone output?
- How do you handle environment variables and secrets?
- How do you add a PostgreSQL database in Coolify?
- What should you configure for production?
- Memory and CPU limits
- Health checks and zero-downtime deploys
- Image optimization
- Caching and ISR
- Rollbacks
- How do you troubleshoot common Coolify + Next.js problems?
- Is self-hosting Next.js with Coolify worth it?
To self-host Next.js with Coolify, install Coolify on a Linux VPS, connect your Git repository, pick the Nixpacks or Dockerfile build pack, set port 3000 and your environment variables, then point a domain at the server. Coolify builds the image, runs the container, and puts it behind a reverse proxy with automatic HTTPS, so every git push becomes a production deploy without a managed platform in the middle.
This guide walks through the whole path: server sizing, installing Coolify, choosing between Nixpacks and a hand-written Dockerfile with output: 'standalone', wiring up PostgreSQL, handling build-time vs runtime environment variables, and the production details that usually bite people later (memory limits, image optimization, caching, health checks and rollbacks). It is the same kind of setup that serves this site, fabwaseem.com, and projects like Foliora.
Why self-host Next.js with Coolify instead of a managed platform?#
Managed platforms are excellent at zero-config deploys. The trade-off is that pricing, limits and runtime behavior are decided for you. Coolify is an open-source, self-hostable alternative that gives you a similar push-to-deploy workflow on hardware you control.
What you get:
- Predictable cost. You pay for the server, not per request, per build minute or per seat.
- One box, many apps. Next.js apps, APIs, workers, PostgreSQL, Redis and static sites can share a server.
- Full Node.js runtime.
next startruns as a long-lived Node process, so server actions, route handlers, ISR and middleware behave like they do locally. - No lock-in. Under the hood it is Docker containers and a reverse proxy. You can leave with your Dockerfile.
What you take on: OS updates, backups, monitoring and capacity planning. If you are not willing to own those, stay on a managed host.
When is a managed platform still the better choice?#
If you rely heavily on a global edge network, per-region functions or a vendor's integrated analytics and image CDN, a managed platform saves real work. Self-hosting shines for full-stack apps with a database, background jobs and steady traffic, where one well-sized VPS does the job.
What do you need before you start?#
| Requirement | Minimum | Notes |
|---|---|---|
| Server | Linux VPS with SSH access, amd64 or arm64 | Ubuntu LTS or Debian is the easy path |
| CPU / RAM | 2 cores, 2 GB RAM (Coolify's documented minimum) | Next.js builds are memory-hungry; give yourself headroom |
| Disk | 10 GB free | Docker images and build cache grow fast; plan for more |
| Domain | An A record you control | Needed for automatic HTTPS |
| Repository | GitHub, GitLab, Bitbucket or any Git URL | GitHub App integration enables push-to-deploy |
| Ports | 22, 80, 443 open (8000 for the first login) | Close 8000 once the dashboard has a domain |
The official Coolify installation guide lists the full requirements and supported distributions.
How do you install Coolify on a VPS?#
SSH into a fresh server as root (or a sudo user) and run the official install script:
curl -fsSL https://cdn.coollabs.io/coolify/install.sh | bashThe script installs Docker if needed, pulls the Coolify containers and prints the dashboard URL. Then:
- Open
http://YOUR_SERVER_IP:8000and create the admin account immediately. Whoever registers first owns the instance. - Back up
/data/coolify/source/.env. It containsAPP_KEY, which encrypts values in Coolify's database; you need it to restore. - In Settings, give the dashboard its own domain (for example
coolify.example.com) so it is served over HTTPS, then close port 8000 in your firewall.
A basic firewall with UFW looks like this:
ufw default deny incoming
ufw default allow outgoing
ufw allow OpenSSH
ufw allow 80/tcp
ufw allow 443/tcp
ufw enable
Docker publishes container ports through its own iptables rules, which can bypass UFW. Don't publish database ports to the host unless you mean to; keep them on Coolify's internal network.
How do you deploy a Next.js app on Coolify?#
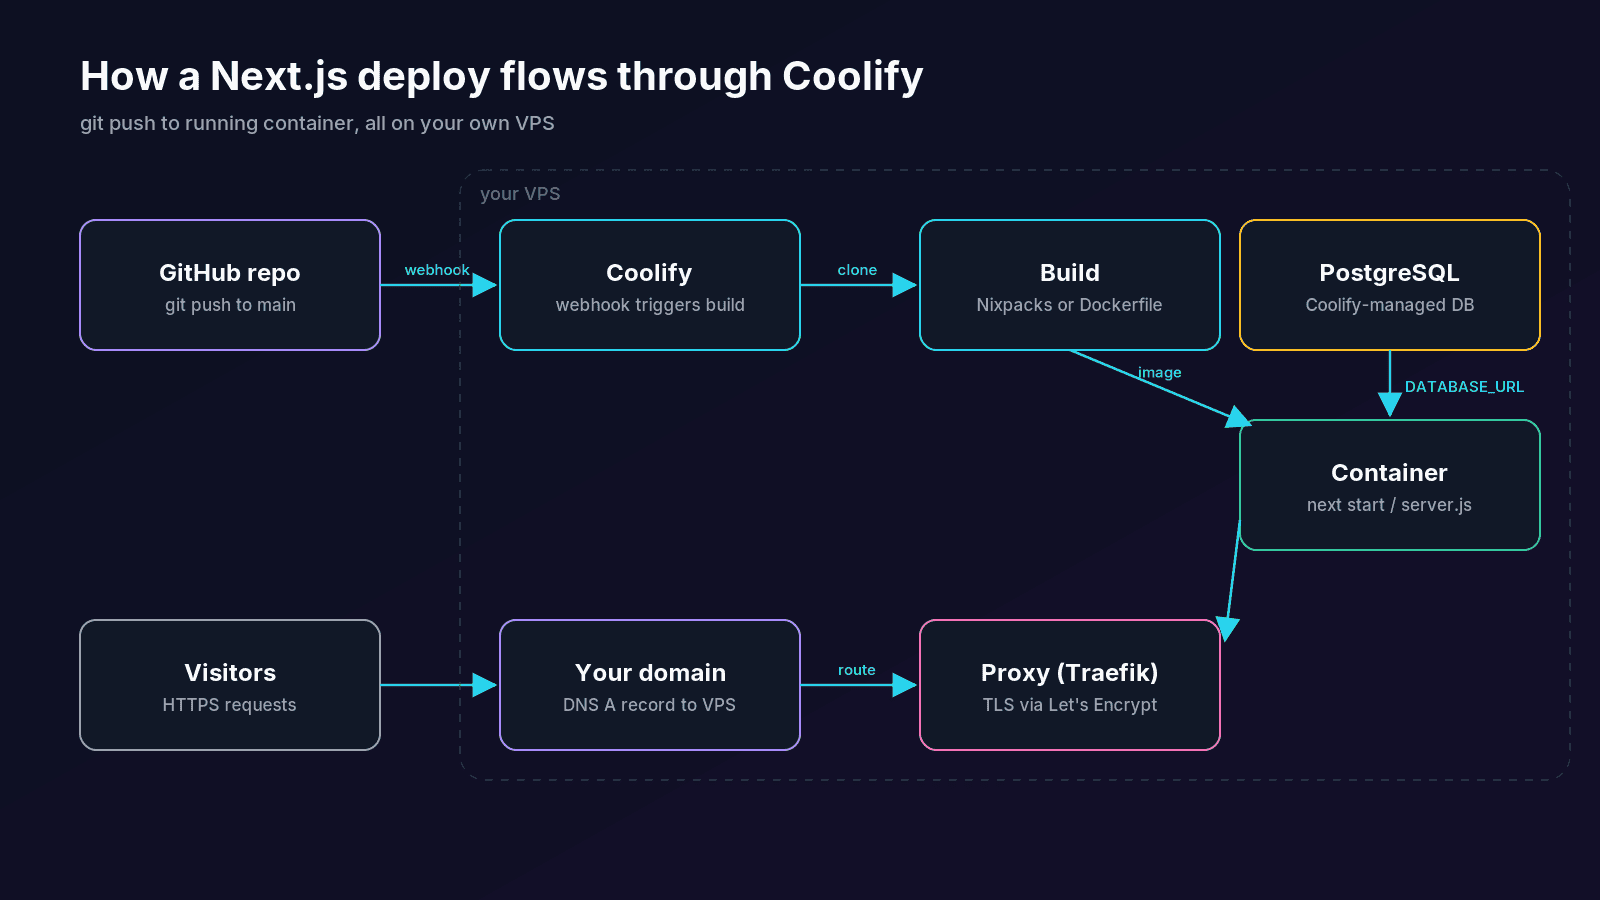
- Create a project in the dashboard (Projects → Add). Projects group an app with its databases and environments.
- Add a resource → Application → choose your Git source. With the GitHub App, Coolify gets a webhook and redeploys on every push to the branch you select.
- Pick a build pack. Start with Nixpacks for a zero-config build, or Dockerfile for full control (covered below).
- Set the exposed port to
3000, the default fornext start. - Add a domain in the format
https://app.example.com. Usinghttps://tells Coolify to request a Let's Encrypt certificate through its proxy. - Add environment variables (next section), then hit Deploy and watch the build log.
Point the domain's A record at your server's IP before deploying so the certificate challenge can succeed. If you sit behind Cloudflare's proxy, use Full (strict) SSL mode so you don't create a redirect loop.
Nixpacks or Dockerfile: which build pack should you use?#
| Nixpacks | Dockerfile | |
|---|---|---|
| Setup | None; detects Next.js from package.json | You write and maintain the Dockerfile |
| Image size | Larger; ships the full node_modules | Small with output: 'standalone' |
| Control | Limited; tweak with env vars or nixpacks.toml | Total: base image, build args, user, layers |
| Node version | Detected from engines or .nvmrc | Pinned in FROM |
| Best for | Prototypes, previews, quick side projects | Production apps you'll run for a long time |
The Coolify Next.js guide documents both paths. Nixpacks is the fastest way to see your app live. For production, I prefer a Dockerfile: builds are reproducible, the image is small and the Node version doesn't change under you.
If you stay on Nixpacks, pin Node explicitly so a detector update doesn't surprise you:
{
  "engines": {
    "node": ">=22 <23"
  }
}
How do you build a production Dockerfile with standalone output?#
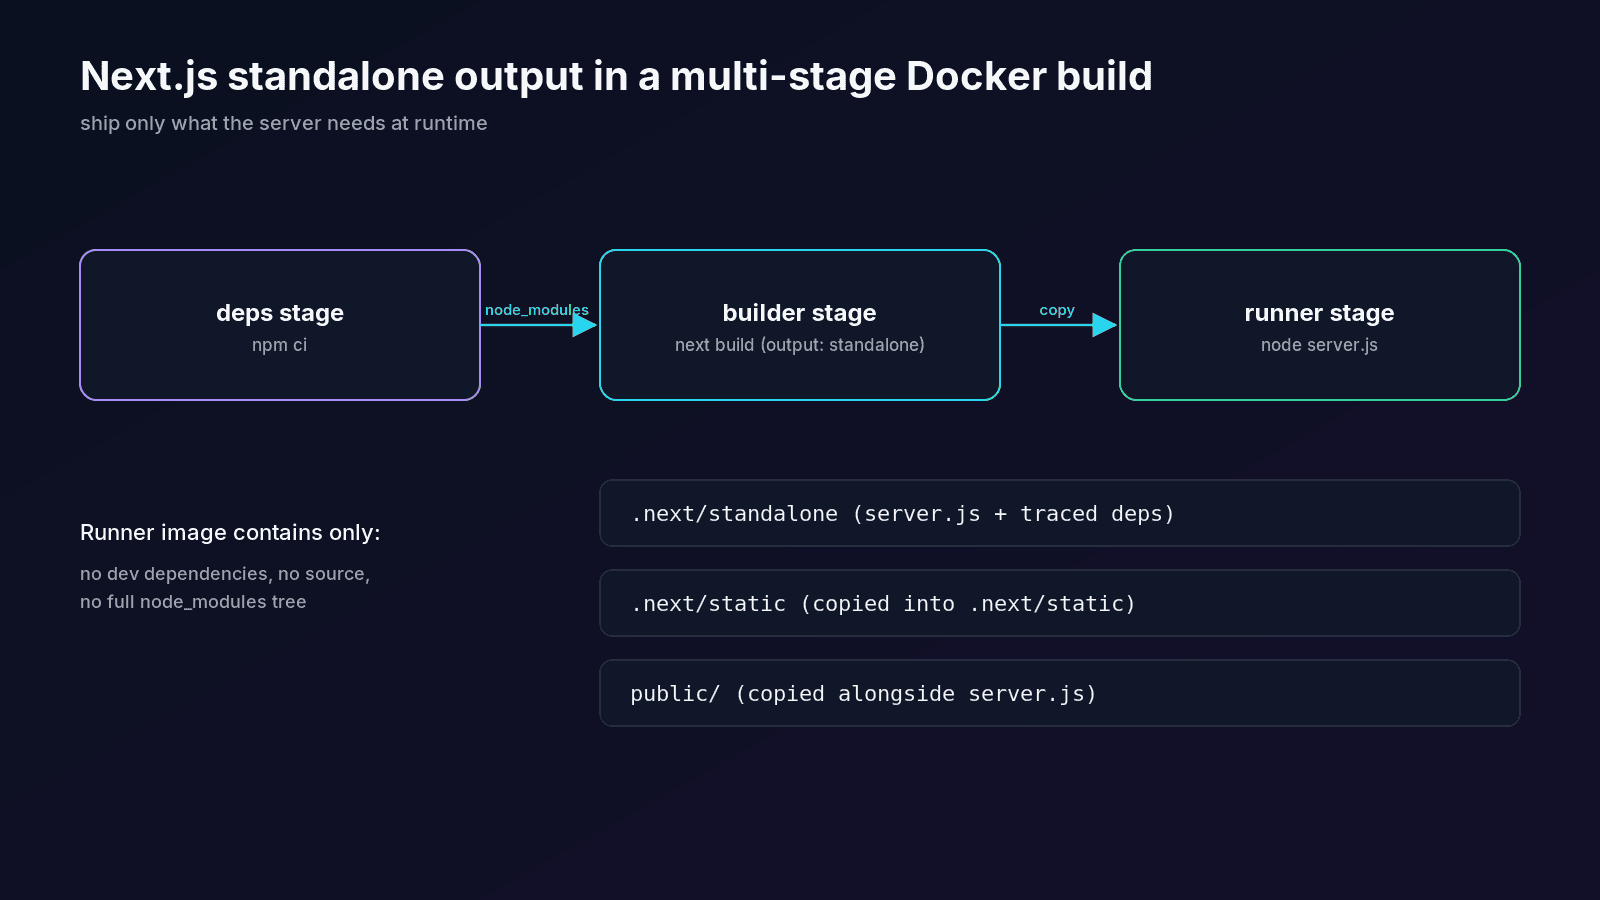
Next.js can trace exactly which files the server needs and emit a self-contained folder. Enable it in next.config.ts:
import type { NextConfig } from 'next';

const nextConfig: NextConfig = {
  output: 'standalone',
};

export default nextConfig;
next build now writes .next/standalone with a minimal server.js and only the traced dependencies. Static assets are not copied in automatically, so the Dockerfile has to copy .next/static and public itself. See the output option in the Next.js docs.
A multi-stage Dockerfile based on the pattern in the official Next.js examples:
# syntax=docker/dockerfile:1
FROM node:22-alpine AS base

FROM base AS deps
RUN apk add --no-cache libc6-compat
WORKDIR /app
COPY package.json package-lock.json ./
RUN npm ci

FROM base AS builder
WORKDIR /app
COPY --from=deps /app/node_modules ./node_modules
COPY . .
ENV NEXT_TELEMETRY_DISABLED=1
RUN npm run build

FROM base AS runner
WORKDIR /app
ENV NODE_ENV=production
ENV NEXT_TELEMETRY_DISABLED=1
RUN addgroup --system --gid 1001 nodejs \
 && adduser --system --uid 1001 nextjs

COPY --from=builder /app/public ./public
COPY --from=builder --chown=nextjs:nodejs /app/.next/standalone ./
COPY --from=builder --chown=nextjs:nodejs /app/.next/static ./.next/static

USER nextjs
EXPOSE 3000
ENV PORT=3000
ENV HOSTNAME=0.0.0.0
CMD ["node", "server.js"]
Two lines matter more than they look:
HOSTNAME=0.0.0.0makes the server listen on all interfaces. Without it, the container can listen only on its internal hostname and the proxy returns a 502 or "no available server".- The non-root
nextjsuser limits the blast radius if the app is ever compromised.
If you use Prisma, add RUN npx prisma generate in the builder stage before npm run build, and make sure the generated client ends up in the traced output (it does by default when imported from server code).
Commit the Dockerfile, switch the build pack to Dockerfile in Coolify, keep port 3000, and redeploy.
How do you handle environment variables and secrets?#
This is the most common source of "works locally, broken in production". Next.js has two kinds of variables:
NEXT_PUBLIC_*variables are inlined into the client bundle at build time. Changing them in the dashboard does nothing until you rebuild.- Server-only variables (
DATABASE_URL, API keys, auth secrets) are read at runtime by the Node process.
In Coolify each variable has a Build Variable toggle. Turn it on for anything next build needs: every NEXT_PUBLIC_* value, plus anything read during static generation. With a Dockerfile build pack, build variables are passed as build args, so declare them in the builder stage:
FROM base AS builder
ARG NEXT_PUBLIC_SITE_URL
ENV NEXT_PUBLIC_SITE_URL=$NEXT_PUBLIC_SITE_URL
Keep real secrets runtime-only. Don't bake them into image layers, because anyone with the image can read them. Validate variables at startup with a schema (for example Zod) so a missing value fails the deploy loudly instead of throwing on the first request.
How do you add a PostgreSQL database in Coolify?#
Inside the same project, add a resource → Database → PostgreSQL. Coolify starts it on its internal Docker network and shows two connection strings:
- Internal URL, using the container name as host. Use this as
DATABASE_URLfor apps on the same server. Traffic never leaves the box. - Public URL, only if you enable public access. Leave that off unless you really need external access, and prefer an SSH tunnel for ad-hoc admin work.
Run migrations as part of deploy, not by hand. With Prisma, a clean pattern is to run them before the server starts:
{
  "scripts": {
    "build": "prisma generate && next build",
    "start:prod": "prisma migrate deploy && node server.js"
  }
}
If you go this route, the runner image needs the Prisma CLI and the prisma folder. Alternatively, use Coolify's pre-deployment command setting to run npx prisma migrate deploy in the new container before traffic switches. Then turn on scheduled backups for the database and send them to S3-compatible storage. A backup that only lives on the same disk is not a backup.
What should you configure for production?#
Memory and CPU limits#
Coolify lets you set resource limits per application. Set them. A runaway Node process or a memory leak should restart one container, not take down the server and every other app on it. Builds are the hungriest step, because next build on a mid-size app can spike well above the app's runtime usage, so leave headroom or use a separate build server once you run several apps.
Health checks and zero-downtime deploys#
Add a lightweight route handler and point Coolify's health check at it:
// app/api/health/route.ts
export const dynamic = 'force-dynamic';

export function GET() {
  return Response.json({ ok: true });
}
With a passing health check, Coolify only switches traffic to the new container once it is healthy, and keeps the old one if the new one fails. Your users never see a half-started app.
Image optimization#
next/image optimizes on the server. In a self-hosted container that means the Node process does the work and caches results on local disk. Recent Next.js versions use sharp automatically, but it pays to keep an eye on CPU during traffic spikes. If images are a big part of the site, offload them to a media CDN with a custom loader and let the app server focus on rendering.
Caching and ISR#
ISR and the data cache write to the container's filesystem by default. That works perfectly on a single container, but the cache resets on every deploy and isn't shared between replicas. If you scale out horizontally, configure a shared cache handler (Redis is the common choice). The Next.js self-hosting guide covers cache handlers, image optimization and streaming behind a proxy.
Rollbacks#
Every deployment is kept as an image, so rolling back is a click in the Deployments tab. Pair that with database migrations that are backward-compatible (add columns first, remove them in a later release) so rolling back the app never breaks the schema.
How do you troubleshoot common Coolify + Next.js problems?#
| Symptom | Likely cause | Fix |
|---|---|---|
| 502 / "no available server" | App listens on the wrong host or port | Set HOSTNAME=0.0.0.0, match "Ports Exposes" to PORT |
| Build killed, exit code 137 | Out of memory during next build | Add RAM or swap, or move builds to a build server |
NEXT_PUBLIC_* value is empty | Not available at build time | Mark it as a Build Variable and redeploy |
Unstyled pages or 404 on /_next/static | Static folder not copied into standalone output | Copy .next/static and public in the runner stage |
| Certificate never issues | DNS not pointing at the server, or port 80 blocked | Check the A record, open 80/443, then redeploy |
| Redirect loop behind Cloudflare | Flexible SSL mode | Switch Cloudflare to Full (strict) |
When something fails, read the deployment log first, then the container logs in the app's Logs tab. Nearly every problem above shows up clearly in one of the two.
Is self-hosting Next.js with Coolify worth it?#
If you run more than one app, need a database next to your app and want costs you can predict, yes. Coolify gives you most of the managed-platform experience (Git deploys, previews, HTTPS, rollbacks, backups) on a server you own, and the escape hatch is a plain Dockerfile. Start with Nixpacks to get live, move to a standalone Dockerfile for production, and put limits, health checks and off-site backups in place before you put real traffic on it.
Want to see what runs on this kind of stack? Browse my projects, including Snagbox, or read the Docker multi-stage build docs to tune your images further.
Questions
Can you self-host Next.js with Coolify for free?
Coolify itself is open source and free to self-host. You still pay for the server it runs on, and optionally for off-site backup storage and a domain.
Does Next.js work fully when self-hosted?
Yes. Running next start (or the standalone server.js) on Node.js supports server components, server actions, route handlers, middleware, ISR and image optimization. Features tied to a specific vendor's platform need their own replacement.
Should I use Nixpacks or a Dockerfile for Next.js on Coolify?
Nixpacks is zero-config and great for getting live or for previews. A multi-stage Dockerfile with output: 'standalone' gives a smaller image, a pinned Node version and reproducible builds, which is the better fit for production.
Why are my NEXT_PUBLIC environment variables empty after deploying?
NEXT_PUBLIC_* values are inlined into the client bundle during next build. In Coolify, mark them as Build Variables (and declare them as ARG in a Dockerfile), then redeploy so the build picks them up.
How much RAM do I need to run Next.js on Coolify?
Coolify's documented minimum is 2 CPU cores and 2 GB RAM for the platform itself. Next.js builds can spike memory well above runtime usage, so leave headroom, add swap, or use a separate build server as you add apps.
Is Coolify a good Vercel alternative for Next.js?
For full-stack apps with a database, workers and steady traffic, Coolify is a strong alternative with predictable costs and no lock-in. If you depend on a global edge network or vendor-integrated features, a managed platform may still save you work.